 Save
Save There's something magical about the morning my neighbor mentioned she'd given up on pancakes altogether—too fussy, too many flips, never quite right. I'd been standing at my stove that very morning, frustrated with the same dance: watching a griddle like a hawk, flipping at just the right moment, always somehow ending up with either rubber or underdone centers. That afternoon, I wondered what would happen if I stopped fighting the traditional method and leaned into the mess instead. What if I just scrambled them, like eggs, right there in the pan? The first batch was hesitant, uncertain, but golden and impossibly soft. I called her over for the next morning, and she stood in my kitchen watching me gently fold the batter into clouds. She's never made a traditional pancake since.
I remember my daughter asking why I kept stirring the pancakes like they were scrambled eggs. She was skeptical, standing beside me in her rumpled pajamas, arms crossed. By the time I spooned the first fluffy mound onto her plate and drizzled it with syrup, her expression shifted entirely. She asked if I could make them this way every Saturday morning. That was two years ago, and those Saturday mornings became our thing—no rushed weekday version, just unhurried time together while something warm and golden happened in the skillet.
Ingredients
- All-purpose flour (1 cup): The backbone that gives structure; measuring by weight keeps things consistent, but spoon and level if you're eyeballing it.
- Granulated sugar (2 tbsp): Just enough to feed the browning and add subtle sweetness without making this feel like dessert.
- Baking powder and baking soda (1 tsp and ½ tsp): The pair that works together to lift and aerate; don't skip either one or you'll lose the fluffiness entirely.
- Salt (¼ tsp): A small anchor that keeps all the flavors honest and prevents the dish from tasting one-dimensional.
- Eggs (2 large): Structure and richness in one ingredient; room temperature eggs blend more smoothly, though don't stress if they're cold.
- Milk (¾ cup): Whole milk gives the most tender result, but 2% works beautifully too.
- Greek yogurt or sour cream (¼ cup): This is the secret that changed everything for me—it adds tanginess and moisture that keeps these pancakes from ever feeling dry.
- Melted unsalted butter (2 tbsp plus more for the skillet): Butter creates those golden edges and adds flavor you simply can't fake with oil.
- Vanilla extract (1 tsp): A quiet accent that rounds out the vanilla notes and makes the whole dish feel a little more special.
- Optional add-ins (½ cup berries, chocolate chips, or diced fruit): Fold these in gently at the end, right before the skillet, so they stay distinct and don't bleed their color into the batter.
Tired of Takeout? 🥡
Get 10 meals you can make faster than delivery arrives. Seriously.
One email. No spam. Unsubscribe anytime.
Instructions
- Combine your dry foundation:
- Whisk the flour, sugar, baking powder, baking soda, and salt in a large bowl until everything is evenly distributed. This is where the leavening agents get their chance to spread throughout, so take a few extra seconds to make sure you don't see any pockets of baking soda sitting alone.
- Bring the wet and dry together:
- Pour the eggs, milk, yogurt, melted butter, and vanilla into the bowl and whisk gently until just combined. Lumps are your friends here—overmixing develops gluten and makes pancakes tough, so stop the moment everything is moistened.
- Scatter in your add-ins:
- If you're using berries, chocolate, or fruit, fold them in with a few gentle turns of your spatula. This keeps them intact and prevents them from turning the whole batter an unappetizing shade of purple.
- Heat your skillet and butter it lightly:
- Set a large nonstick skillet over medium heat and let it warm for a minute. Once it's hot enough that a drop of water sizzles gently, swirl in a small amount of butter, coating the surface evenly.
- Pour and wait for the edges to set:
- Pour all the batter into the center of the skillet in one generous heap. Resist every urge to touch it for the first minute or two while the edges begin to firm up and the bottom develops a light golden crust.
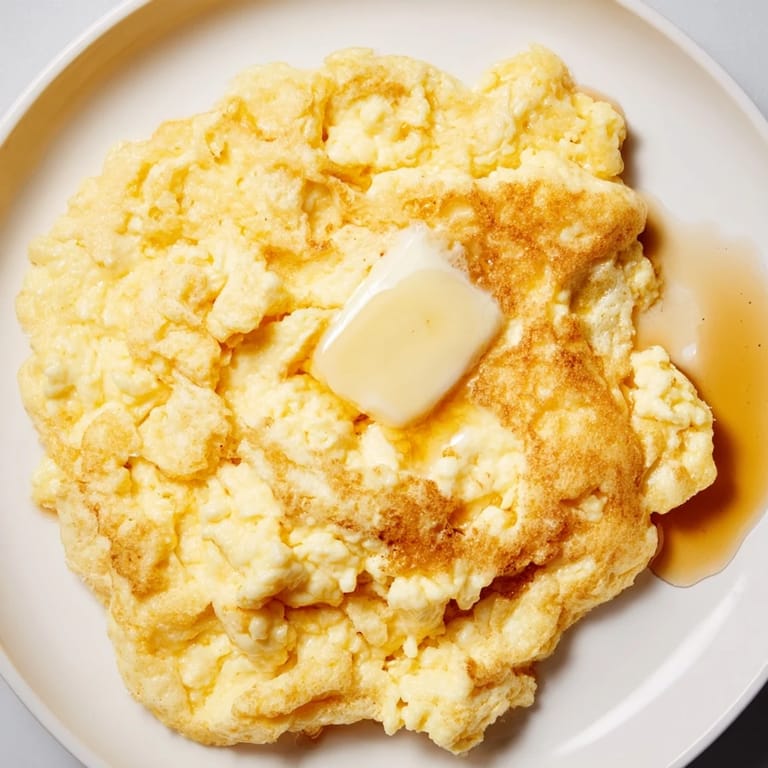
- Scramble and fold with a gentle hand:
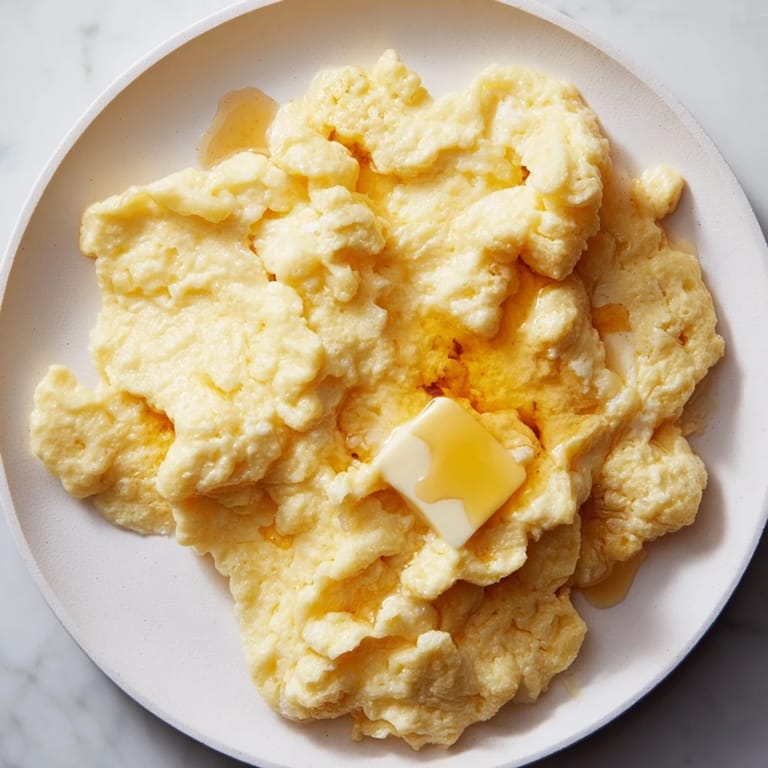
- Using a spatula, begin breaking the batter into large, soft curds, gently folding it over itself the way you would scrambled eggs. This is the magic moment—you're creating texture and encouraging even cooking without pressing or smashing.
- Keep folding until golden and cooked through:
- Continue folding and cooking for another 3 to 4 minutes, until the largest pieces no longer look wet on the inside and everything has taken on a light golden color. The residual heat will continue to cook even after you remove it from the flame.
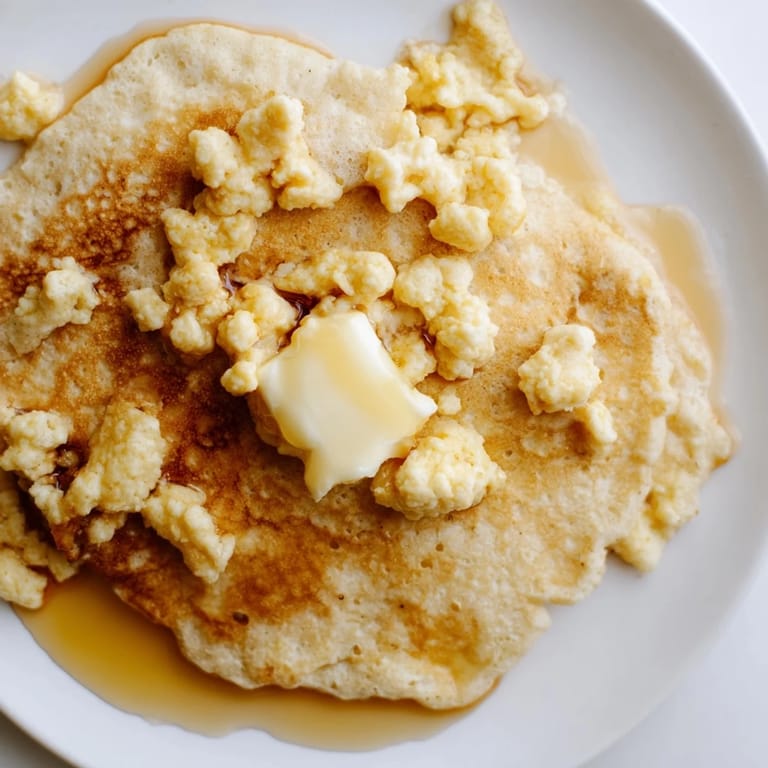
- Serve immediately while the warmth is still alive:
- Transfer to a plate and crown with syrup, fresh fruit, whipped cream, or whatever brings you joy. These are best eaten right away while the steam is still rising.
 Save
Save There was a morning when I made these for my mother, who'd spent decades perfecting the traditional flip-and-slide method. She watched me scramble them with obvious skepticism. When she took the first bite, she got quiet in the way people do when something surprises them in a good way. She called them decadent—her exact word. That moment taught me that the best recipes are the ones that make someone reconsider what they thought they already knew.
The Science of Scrambled Pancakes
Scrambled pancakes work because you're essentially creating the same fluffy structure as traditional pancakes but without relying on a single, uninterrupted setting period. The gentle folding motion incorporates air while the batter cooks, which means every fold is a small burst of leavening. The yogurt or sour cream adds both acidity and moisture, which react with the baking soda to create lift, while also keeping the final texture tender and almost custardy. This method also gives you more control over doneness because you're cooking from multiple angles at once.
When to Customize and How
I've learned that timing matters when you're adding extra flavors or textures. Spices like cinnamon or nutmeg should go into the dry ingredients, while zests and extracts can be folded in with the wet. If you want to push this toward something savory, reduce the sugar by half and add shredded cheese, fresh herbs, or even crispy bacon to the fold. The beauty of this method is that it's endlessly forgiving—I've made versions with mashed banana, applesauce, or even a dollop of peanut butter.
Serving Suggestions and Leftover Magic
These pancakes are best eaten immediately, but they have a secret life the next morning. I've learned to store any leftovers in an airtight container and gently rewarmed them in a low oven (around 300°F) for a few minutes, which brings back their softness. They won't taste quite like fresh, but they're still luxurious and require almost no effort. For serving, think beyond syrup—whipped cream, Greek yogurt with honey, a drizzle of caramel, or even a spoonful of jam can transform them into something that feels entirely new.
- Make a bigger batch and freeze the cooled pieces in a single layer before transferring to a freezer bag for up to two weeks.
- Serve with something cold and creamy on the side to contrast the warm, fluffy pancakes.
- Don't be shy about doubling the recipe if you have hungry people at your table.
 Save
Save There's something deeply satisfying about serving food that feels both effortless and indulgent, that makes people slow down and notice what they're eating. These pancakes do that—they're a small rebellion against the idea that breakfast has to be complicated to be special.
Recipe FAQs
- → How do I achieve fluffier pancakes?
Separate eggs, whisk the whites to soft peaks, and fold gently into the batter before cooking to boost fluffiness.
- → Can I use alternative dairy products?
Yes, swapping Greek yogurt with buttermilk adds a tangy note while maintaining tender texture.
- → What cooking technique is used here?
Instead of traditional flipping, the batter is gently scrambled and folded in a skillet to create soft, large curds.
- → Are there suggested flavor additions?
Try cinnamon, lemon zest, blueberries, or chocolate chips to enhance the flavor and texture variety.
- → What tools are needed for preparation?
A large mixing bowl, whisk, nonstick skillet, and spatula ensure smooth preparation and cooking.