 Save
Save My neighbor knocked on my door one Sunday afternoon holding an empty casserole dish and asking if I had any Buffalo sauce. She was making something for a potluck and had run out mid-recipe. I handed her the bottle, curious, and an hour later she returned with a tray of these sliders still warm from the oven. The smell alone made me forget I'd already eaten lunch. One bite and I was furiously texting her for the recipe before she even made it back to her driveway.
I brought these to a birthday party once, thinking they'd be a side option next to the usual chips and dip. Within ten minutes, the entire tray was gone and people were asking if I had more in the car. A guy I barely knew offered to trade me his homemade salsa for the recipe. I've never seen adults hover around a baking dish like that, refreshing their drinks just to stay close in case someone left a slider behind.
Ingredients
- Cooked chicken breast, shredded: Rotisserie chicken works perfectly here and saves you from boiling and shredding, just pull the meat and you're halfway done.
- Buffalo wing sauce: This is the soul of the recipe so use a brand you actually like eating on wings, not the one that's been sitting in your fridge since last year.
- Cream cheese, softened: Let it sit on the counter for at least thirty minutes or you'll be wrestling with cold chunks that refuse to blend smoothly.
- Ranch dressing: The cooling contrast to the heat, and it adds a creamy tang that balances the sharpness of the Buffalo sauce.
- Sour cream: This makes the filling luscious and keeps it from drying out in the oven, plus it mellows the spice just enough.
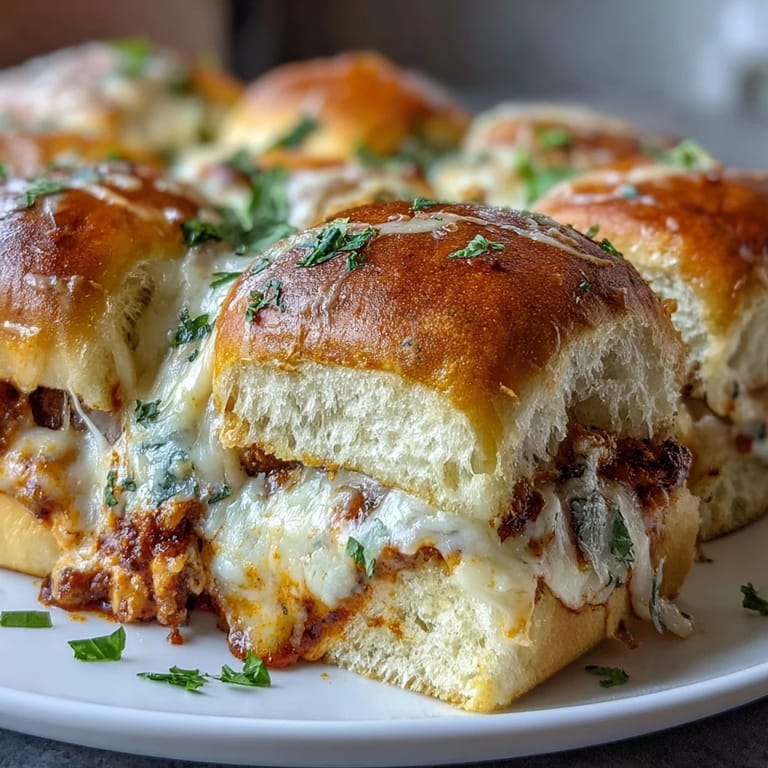
- Shredded mozzarella cheese: Melts into gooey strings that hold everything together and stretch beautifully when you pull a slider apart.
- Shredded cheddar cheese: Adds a sharper, richer flavor that cuts through the creaminess and gives the top a beautiful golden color.
- Slider buns: Hawaiian rolls are my favorite because their slight sweetness plays off the spicy dip, but any soft dinner roll works if that's what you have.
- Unsalted butter, melted: The base for that glossy, garlicky top coat that makes the buns crisp up without getting hard.
- Garlic powder: A little goes a long way here, it seeps into the buns as they bake and makes your kitchen smell like a pizzeria.
- Chopped fresh parsley: Optional but worth it for a pop of color and a hint of freshness that makes the tray look less like a pile of cheese and more like something you meant to serve.
Tired of Takeout? 🥡
Get 10 meals you can make faster than delivery arrives. Seriously.
One email. No spam. Unsubscribe anytime.
Instructions
- Preheat and Prep:
- Set your oven to 350°F and lightly grease a 9x13 inch baking dish so the bottoms don't stick. This is also a good time to clear some counter space because you'll need room to work.
- Make the Dip:
- In a large bowl, stir together the shredded chicken, Buffalo sauce, softened cream cheese, ranch dressing, and sour cream until everything is evenly coated and creamy. It should look like a thick, spicy chicken salad.
- Add Half the Cheese:
- Fold in half of the mozzarella and half of the cheddar, saving the rest for the top. This keeps some cheese inside for creaminess and some on top for that bubbly, golden finish.
- Slice the Buns:
- Cut the slider buns in half horizontally, keeping the bottom layer connected if you can so they stay in one solid sheet. Place the bottom halves in your greased baking dish.
- Spread the Filling:
- Spoon the Buffalo chicken mixture evenly over the bottom buns, spreading it all the way to the edges. Don't be shy, you want every bite to be loaded.
- Top with Cheese:
- Sprinkle the remaining mozzarella and cheddar over the chicken layer. The cheese will melt down into the dip and seal the tops to the bottoms.
- Add the Tops:
- Place the top halves of the buns over the cheese, pressing down gently so everything sits snug. They'll puff up a little as they bake.
- Brush with Garlic Butter:
- Mix the melted butter with garlic powder and brush it generously over the tops of the buns. This is what makes them golden and crispy, so don't skimp.
- Bake Covered:
- Cover the dish with foil and bake for 15 minutes to let the cheese melt and the flavors meld. The foil traps steam so the buns stay soft inside.
- Finish Uncovered:
- Remove the foil and bake another 8 to 10 minutes until the cheese is bubbly and the tops are golden brown. Watch them closely at the end so they don't burn.
- Garnish and Serve:
- Sprinkle chopped parsley over the top if you like, then slice into individual sliders and serve warm. They're best eaten right away while the cheese is still stretchy.
 Save
Save I made these the night before a road trip once and packed them in a cooler. We reheated them in a rest stop microwave and ate them in the parking lot, and somehow they tasted even better with terrible coffee and the smell of gasoline. My friend said it was the best thing she'd eaten all week, which might've been the exhaustion talking, but I'm still counting it as a win.
Make It Your Own
If you like things spicy, add a few shakes of hot sauce directly into the dip or drizzle it over the top before baking. I've also stirred in crumbled blue cheese for people who love that sharp, funky bite with their Buffalo flavor. Cooked bacon pieces or sliced green onions folded into the mixture add little bursts of flavor that make each slider feel a bit more loaded and indulgent.
Serving Suggestions
These are perfect on their own, but I like to serve them with celery sticks and extra ranch or blue cheese dressing on the side for dipping. Carrot sticks work too if you want something crunchy and slightly sweet to balance the heat. A big bowl of tortilla chips and some cold beer or lemonade round out the spread and keep everyone happy while the sliders disappear.
Storage and Reheating
Leftovers keep in an airtight container in the fridge for up to three days, though I've never had them last that long. Reheat individual sliders in the microwave for about 30 seconds or warm the whole tray covered with foil in a 300°F oven for 10 minutes. The buns won't be quite as crispy as fresh out of the oven, but the filling stays creamy and delicious.
- You can freeze assembled, unbaked sliders for up to a month and bake them straight from frozen, just add a few extra minutes.
- Brush a little extra melted butter on top before reheating if you want to bring back some of that golden crispness.
- They're also great cold the next morning if you're the type who eats leftovers standing in front of the fridge.
 Save
Save These sliders have saved me more times than I can count, from last minute potlucks to lazy Sunday dinners when I didn't feel like cooking anything complicated. They're messy, cheesy, and completely worth the napkins.
Recipe FAQs
- → Can I make these sliders ahead of time?
Yes, you can assemble the sliders up to 24 hours in advance. Cover tightly with plastic wrap and refrigerate. When ready to serve, brush with garlic butter and bake as directed, adding a few extra minutes to the cooking time since they'll be cold from the fridge.
- → What type of chicken works best for this dish?
Rotisserie chicken is an excellent time-saver and adds great flavor. You can also use leftover cooked chicken breast, poached chicken, or even canned chicken in a pinch. Just make sure it's shredded into bite-sized pieces for the best texture.
- → Can I adjust the spice level?
Absolutely! For milder sliders, use less Buffalo sauce or choose a mild variety. For extra heat, add cayenne pepper, hot sauce, or diced jalapeños to the chicken mixture. You can also serve with additional Buffalo sauce on the side for those who want more kick.
- → What can I substitute for Hawaiian rolls?
Any soft dinner rolls or slider buns work well. Brioche buns add a buttery richness, while potato rolls provide a slightly sweet flavor. Just ensure the buns are connected in a sheet for easier assembly and slicing.
- → How should I store and reheat leftovers?
Store leftover sliders in an airtight container in the refrigerator for up to 3 days. Reheat in a 300°F oven for 10-15 minutes until warmed through, or microwave individual sliders for 30-45 seconds. The oven method keeps the buns from getting soggy.
- → Can I freeze these sliders?
Yes, assemble the sliders without baking, wrap tightly in plastic wrap and aluminum foil, and freeze for up to 2 months. Thaw overnight in the refrigerator before baking as directed. This makes them perfect for meal prep or having party food ready to go.